I love cooking. I love having friends over to eat nice food, drink a few Babychams and natter for hours in a cosy kitchen. Alas, our kitchen was making me a bit sad. Here's how it looked...


We created a kitchen that served us well but I started getting the bug to re-do it, mainly after seeing the rather fabulous job Kate had done on hers. [Thanks Abi! I posted some photos here a while back if you want to see it]. I wanted a bit more character, a little more storage and a lot more work surface; I wanted to create a room that nodded towards my mid-century tastes but didn't want it to end up looking like a retro home. So off I went with a (slightly) larger budget than nine years ago and barrel load of ideas. And now it looks like this...

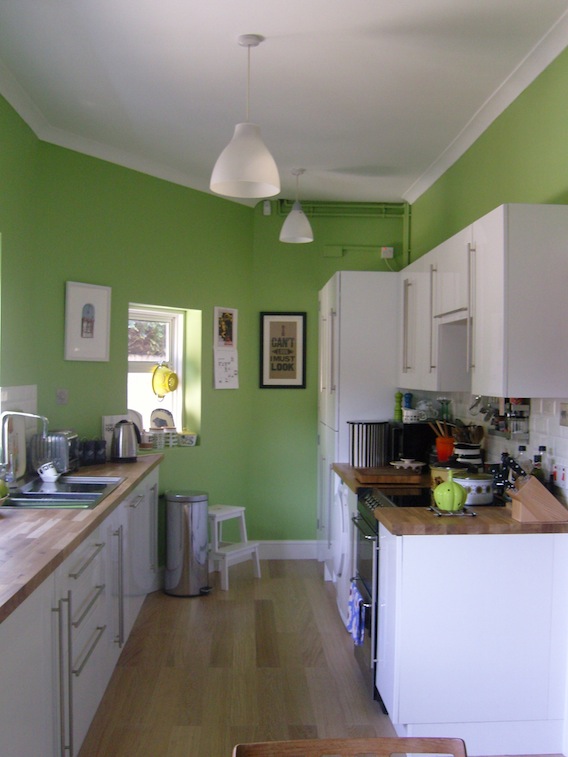
The first thing was a major decision: to remove the wall that separated the kitchen and utility room – we decided to do this to free up space and create a galley kitchen; giving us more light and space so it would feel more like a kitchen/dining room. This was the worst bit of the project – clearing out the entire kitchen, everything covered in dust and rubble (my idea of hell, DUST), and masses of hammering; not good when you work at home. Still, our fab builder did it in a few days and then the real fun started...


I always liked the high gloss white units we had so to save money we just hunted around and bought a few extra units and doors to add to the existing ones. I used DIY Homefit for the doors – they also make custom size doors at very reasonable prices. We also reused a left over door to add to the plinths. All the appliances went into integrated units to keep the sleek look of the kitchen; except the tumble-dryer – it's extraordinarily expensive to find an integrated one so we just tucked the new one under the worktop. I also caved, after many years of resistance, to a dishwasher. I am now a bit evangelical about it; they're lovely things. I love mine very much.
We upgraded the (now much longer) worktops to solid oak; you need to sand them down and then apply about six coats of wood oil to seal them. Remember to reapply the wood oil once a year to help keep the wood looking delightful. I loved the mix of woods taking shape; especially knowing the teak table and chairs just waiting to be moved in (more on them later).

We replaced the brown tiles on the walls with small white brick bevelled tiles, above; Tons of Tiles supply exactly the same tiles as other fancypants high street stores but at half the price. I love these little tiles; retro but super high gloss to go with the cupboards.

Finally, the paint decision. Never have I deliberated more. I didn't want white or beige or anything neutral but equally I didn't want too heavy a colour to darken the kitchen again. In the end I went for an apple green; it's bright and crisp during the daylight but at night in artificial light it goes a zingy lime. I got the paint from Crown at B&Q after looking at many many expensive others – it's called Olive Press but don't be fooled, it's definitely apple green. Maybe it's a confused olive, either way I think it makes my kitchen look yummy.
And then, after three long weeks of dust, dirt, grime and washing up in the bath I got to do the thing I'd been waiting for: putting everything back and hanging pictures and scattering 60s and 70s pottery everywhere – heaven. I'd been buying up cheap bits and pieces from Ebay, scouring car boots (there's a particularly brilliant one, Fontwell Park Car Boot, near my mother-in-law's and charity shops and have found a few gems, like these...


The table was the best bargain – totally free from a trader at the aforementioned car boot; he was packing up for the day and just didn't want to take it back with him – we couldn't believe our luck – a teak 1969 Macintosh table; it's always worth hanging about the big traders at the end of the day I've discovered; they'd often rather give stuff away than cart it back with them. The danish teak chairs we had in storage and fit perfectly with my mid-century vision, although I think I'll recover the seats with a green fabric at a later date.
So, the kitchen's all done and on a fraction of what you could've spend if you'd got a big store to do it. It might take longer, the dust and grime and upheaval are nearly unbearable and I never want to see another microwave meal in my life but now I have my dream kitchen; full of personal touches that make me smile when I'm cooking and, if I'm completely honest, I think my cakes taste a teeny bit better too.
You have done a superb job....congrats on your super duper new kitchen ....enjoy!
ReplyDeleteBestest from
daisy j
Thank you! Makes all the hard work worthwhile when I'm cooking up a storm now!
DeleteVery lovely, great colour and some fab crockery - how great that you have the space to show it off now!
ReplyDeleteThanks Anna!
DeleteLove this kitchen and so impressed with all the hard work. The colour scheme is really original and I love how personalised it is. We just diy'd our kitchen but still have things to finish off, this gave me hope that we WILL get there!!
ReplyDeleteThank you Jenni - hang in there; I thought I'd never see a dust free worktop again....x
DeleteTell me, Abi, how do you keep that oiled oak floor stain-free in a working kitchen? My new one has already acquired lots of little grease stains - despite putting mats in front of the stove, etc.
ReplyDeleteIs there a way of removing stains from brushed and oiled oak floors? Anybody knows?
Hello - the floor we put down is an engineered oak (the worktops are oiled oak); it's fairly robust and designed for heavy wear and tear; I just mop up any spills and stains as I go along! Not sure about removing stains from oiled floors though...anyone help?
DeleteHi Abi, It looks fab!! I am your Mum's 'Boss' and she told me what you were doing and she described it perfectly. We'll keep a look out for more pieces to add to your fantastic creation.
ReplyDeleteWell done, Enjoy!!
Hi Abi,
ReplyDeleteWe have just been admiring your kitchen makeover here at Tons of Tiles HQ and we love it!
Top Work!
Regards,
Team TOT :)
Hello Team TOT! Just seen your message - glad you like it! Thanks for the top tiles :) x
DeleteWow, what a drastic change! Say hello to the vibrant, bright green kitchen. Congrats on surviving the laborious phase of remodeling. Now, tell us how it’s more enticing to eat in your revamped kitchen. Arthur @ ContractorExpress.com
ReplyDeleteWhat an awesome reveal. Gone is the sad and dull-looking kitchen, and enter the kitchen that will inspire you to have a nightcap and cookout with friends. The color looks lively and appetizing – perfect for spicing up your kitchen shenanigans. Jared @ DesMoinesIowaContractor.com
ReplyDeleteNice interior designing interior decoration!
ReplyDelete